

By Matt Harrison
This article was excerpted from the book Hapi.js in Action.
Handlers are where you declare what should actually happen when a request matches one of your routes. The basic handler is just a JavaScript function with the signature:
function (request, reply) {...}
There are also a number of built-in handlers that you can use to define complex behaviour through configuration. An example of one of these is the directory handler for serving static content:
Listing 1: The built-in directory handler
server.route({
   method: 'GET',
   path: '/assets/{path*}',
   handler: {
      directory: {                             //#A
      path: Path.join(__dirname, 'assets')     //#A
      }                                        //#A
   }
});
#A: Behavior of the route is defined in configuration using built-in directory handler
One of the central philosophies of hapi is that configuration is favourable over code. Configuration is usually easier to write, easier to read, easier to modify and reason about than the equivalent code.
If you find yourself repeating a common set of tasks or behaviour in your handlers, you could consider extracting a new custom handler type. Without further ado, let’s see an example.
The internationalization (i18n) example
In this example, we’re building a (very) small website. The website will cater to an international audience, so we want to include support for multiple languages from the start. Internationalization, also known as i18n, isn’t a feature that’s built into hapi so you’re going to create it yourself!
In this article, you’re going to see how you can write a custom handler to wrap up the complexity of this task into a simple-to-use handler.
The website, which is in its early stages of development, currently only has one page—the homepage. We have created a Handlebars template for that:
Listing 2: templates/index.hbs
<h1>Hello!</h1>
Ok, so when I called it a website I was probably overstating things. It’s just a single line of HTML that says hello—but it has potential!
We currently have a simple skeleton hapi application to serve this view.
Listing 3: index.js: the basic website application
const Hapi = require('hapi');
const Path = require('path');

const server = new Hapi.Server();
server.connection({ port: 4000 });

server.register(require('vision'), (err) => {     //#A

   if (err) {
      throw err;
   }

   server.views({                                //#B
      engines: {                                 //#B
         hbs: require('handlebars')              //#B
      },                                         //#B
      path: Path.join(__dirname, 'templates')    //#B
   });                                           //#B

   server.route([
      {
         method: 'GET',
         path: '/',
         handler: {                              //#C
            view: 'index'                        //#C
         }                                       //#C
      }
   ]);

   server.start(() => {

      console.log('Server started!');
   });
});
#A: Load vision module
#B: Configure view engine
#C: Use the view handler to render the index template
We’ve decided to send off our Handlebars templates to translators. So we send them off to a French and a Chinese Translator. We also come up with a new naming scheme, suffixing the template name with the ISO 639-1 two letter language code. We now have three templates in total. They are named
templates/index_en.hbs     //#A
templates/index_fr.hbs     //#B
templates/index_zh.hbs     //#C
#A: English template
#B: French template
#C: Chinese template
Parsing the Accept-Language header
Our application needs to look at an incoming request and decide which language-specific template it should serve, as shown in Figure 1.

Figure 1: The application should determine which template to use
The Accept-Language header, when present, specifies the user’s preferred languages, each with a weighting or priority (called a “quality factor” in the HTTP spec, denoted by q). An example of an Accept-Language header is:
Accept-Language: da, en-gb;q=0.8, en;q=0.7
This can be translated into:
I would like this resource in Danish. If you don’t have Danish, I would like British English. If you don’t have British English, I will settle for any kind of English.
We can use a Node.js package, appropriately named accept-language, to help out parsing those headers into a more usable form. To see what kind of thing the accept-language module gives us back, you can run this one-liner (after npm install --save accept-language in our project) in your terminal:
node -e "console.log(require('accept-language'
   ).parse('da, en-gb;q=0.8, en;q=0.7'))"
The output should be:
[ { value: 'da', language: 'da', region: null, quality: 1 },
  { value: 'en-gb', language: 'en', region: 'gb', quality: 0.8 },
  { value: 'en', language: 'en', region: null, quality: 0.7 } ]
The array returned by AcceptLanguage.parse() is ordered by user language preference.
First implementation
We can use our language-specific templates and knowledge of the Accept-Language header to build a naive implementation of our i18n-enabled hapi-powered website.
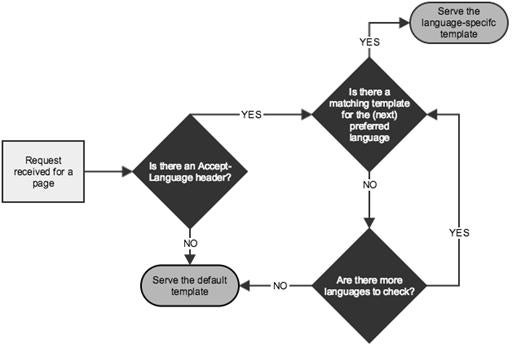
Figure 2: The process we will use to find a suitable template for a request
When a request is received, we want to check if we have a matching template for any of the languages in the Accept-Language header. If there’s no header present, or there are no matching templates, we will fall back to rendering the default language template. This process is shown in figure 2.
The implementation of this for a single route is shown below:
Listing 4: index.js: I18n-enabled route serving language-specific templates
server.route([
   {
      method: 'GET',
      path: '/',
      handler: function (request, reply) {

         const supportedLanguages = ['en', 'fr', 'zh'];        //#A
         const defaultLanguage = 'en';                         //#A
         const templateBasename = 'index';

         const acceptLangHeader =                              //#B
            request.headers['accept-language'];
         const langs =
            AcceptLanguage.parse(acceptLangHeader);            //#B

         for (let i = 0; i < langs.length; ++i) {              //#C
            if (supportedLanguages.indexOf(langs[i].language)  //#C
               return reply.view(templateBasename +            //#C
               '_' + langs[i].language);
            }                                                  //#C
         }                                                     //#C

         reply.view(templateBasename + '_'                     //#D
            + defaultLanguage);
      }
   }
]);
#A: Define some settings
#B: Parse the Accept-Language header
#C: Loop through each preferred language and if the current one is supported, render the view
#D: Otherwise, render the default language’s view
You can test this out, trying different Accept-Language headers, by sending some requests with cURL:
$ curl localhost:4000/ -H "Accept-language: en"
<h2>Hello!</h2>

$ curl localhost:4000/ -H "Accept-language: zh"
<h2>你好!</h2>

$ curl localhost:4000/ -H "Accept-language: fr"
<h2>Bonjour!</h2>

$ curl localhost:4000/ -H "Accept-language: de"
<h2>Hello!</h2>
Making things simple again
Although our first implementation works for sure, it’s pretty ugly and involves a lot of boilerplate code that needs to be copied into each of our handlers for any new routes we add. Do you remember how easy it was to use basic view handler from vision? That was a simpler time; we want to get back to that:
server.route([
   {
      method: 'GET',
      path: '/',
      handler: {
         view: 'index'
      }
   }
]);
What we need to do then is to build a custom handler that can be used just like the above code sample and takes care of all the messy business behind the scenes for us. You create new custom handlers using the server.handler() method.
(API METHOD server.handler(name, method)
(http://hapijs.com/api#serverhandlername-method)
Your custom handler function will accept the route and the options given to it as parameters and should return a handler with the usual function signature.
Listing 5: index.js: creating the custom i18n-view handler
  server.handler('i18n-view', (route, options) =>
  const view = options.view;                           //#A

   return function (request, reply) {

      const settings = {                               //#B
         supportedLangs: ['en', 'fr', 'zh'],           //#B
         defaultLang: 'en'                             //#B
      };

      const langs =                                    //#C
         AcceptLanguage.parse(request.headers
         ['accept-language']);

      for (let i = 0; i < langs.length; ++i) {         //#D
         if (settings.supportedLangs.indexOf           //#D
               (langs[i].language) !== -1) {
            return reply.view(view + '_'               //#D
               + langs[i].language);
         }                                             //#D
      }                                                //#D

      reply.view(view + '_' +                          //#E
         settings.defaultLang);
   }
});
#A: View name is passed in through options
#B: Define some settings
#C: Parse the Accept-Language header
#D: Loop through each preferred language and if the current one is supported, render the view #E: Otherwise, render the default language’s view
One improvement I would like to add to this is to remove the settings object from the handler. Having these explicit values in there tightly binds the custom handler to our usage. It’s a good idea to keep configuration like this in a central location.
When creating a hapi server you can supply an app object, with any custom configuration you would like. These values are then accessible inside server.settings.app, so let’s move the i18n configuration there:
Listing 6: index.js: storing app config in server.settings.app
const server = new Hapi.Server({
   app: {                                           //#A
      i18n: {                                       //#A
         supportedLangs: ['en', 'fr', 'zh'],        //#A
         defaultLang: 'en'                          //#A
      }                                             //#A
   }                                                //#A
});

...

server.handler('i18n-view', (route, options) => {
   const view = options.view;

   return function (request, reply) {

      const settings = server.settings.app.i18n;   //#B

...
#A: Store application config when creation server
#B: Access same config later in server.settings.app
Now to use our shiny new custom handler is as simple as supplying an object with an i18n-view key and setting the template name:
Listing 7: index.js: using the custom i18n-handler handler
server.route([
   {
      method: 'GET',
      path: '/',
      handler: {
         'i18n-view': {
            view: 'index',
         }
      }
   }
]);
We can reuse this handler now throughout our codebase without any ugly boilerplate code.
 |
Hapi.js: Building custom handlers By Matt Harrison This article was excerpted from the book Hapi.js in Action. |