

When the data a Web application accepts from the user is too much, splitting the entire Web form into multiple logical sections is a desirable solution. To accomplish this in classic ASP or even ASP.NET 1.x, developers used to create a wizard: multiple Web forms each containing a part of the total information. However, this approach often proved complex and time consuming. ASP.NET 2.0 provides a new control, called Wizard, that allows hassle-free development of such Web forms. This article demonstrates how to use this control in a typical user registration.
Creating a Web Form with Wizard Control
Begin by creating a new Web site in VS.NET 2005. Drag and drop a Wizard control on the default Web form. The Wizard control is represented by a <asp:Wizard> tag in the markup and by a Wizard class in the code. Figure 1 shows the Wizard control in action.
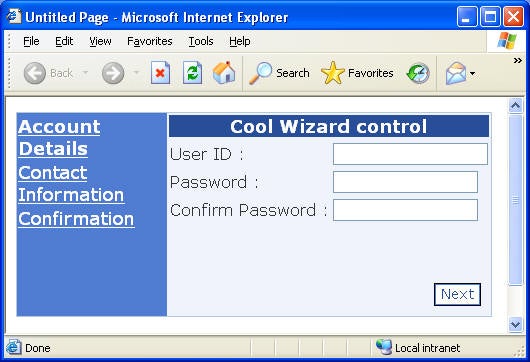
Figure 1: Structure of Wizard Control
On the left-hand side, you have a set of navigation links (Account Details, Contact Information, and so forth). This region of the Wizard is called a side bar. The area where the actual data entry controls appear is often called a view. At the top, you have a header, and at the bottom you have a navigation bar.
Formatting the Wizard Control
The easiest way to apply formatting to the Wizard control is via the “Auto Format” feature. Select the Wizard control and from its smart tag select “Auto format” to open the Auto Format dialog (see Figure 2).
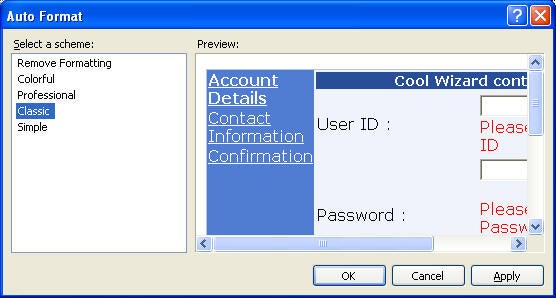
Figure 2: Auto Format Dialog
Here, you can select a formatting theme that will quickly apply to the Wizard. You can, of course, customize various formatting attributes manually via various “styles” of the control. Figure 3 shows all the available styles.
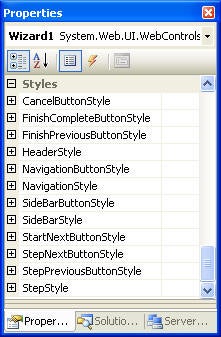
Figure 3: Styles of Wizard Control
Adding Wizard Steps
The main job in using the Wizard control is managing Wizard steps, which act as containers for a set of controls. Each step is represented by the <asp:WizardStep> markup tag.
In order to add or remove steps to the Wizard control, select the “Add/Remove WizardSteps…” option from its smart tag (see Figure 4).
Figure 4: Smart Tags of the Wizard Control
This will open “WizardStep Collection Editor,” as shown in Figure 5.
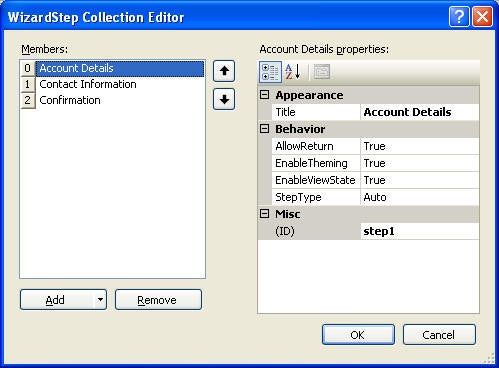
Figure 5: WizardStep Collection Editor
Add in all three steps as shown in Figure 5. Set the Title property of each set to Account Details, Contact Information, and Confirmation, respectively. Also, set the ID property of the three steps to step1, step2, and step3, respectively. The ID property identifies a specific wizard step in the code.
Now, design the three wizard steps. Go to the Web form designer and click the “Account Details” step. This will make that step the active step. Design the step as shown in Figure 6.

Figure 6: Designing Account Details WizardStep
The step consists of three Labels, three TextBoxes, and the validator controls attached to them. The TextBoxes accept the user ID and password. Each of the three TextBoxes has a RequiredFieldValidator attached. Additionally, a CompareValidator ensures that the value entered in the password TextBox matches the one in the confirm password TextBox.
Now click the “Contact Information” step and design it as shown in Figure 7.

Figure 7: Designing Contact Information WizardStep
The “Contact Information” wizard step consists of two Labels, two TextBoxes, and the validator controls attached to them. The TextBoxes accept the user’s e-mail address and telephone number. The RequireFieldValidator and RegularExpression validator controls attached to them ensure that the end user enters the correct input. Note how this step automatically displays Previous and Next buttons.
Finally, design the “Confirmation” wizard step as shown in Figure 8:
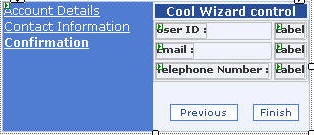
Figure 8: Designing Confirmation WizardStep
The Confirmation wizard step simply displays all the pieces of information entered on the previous steps as a confirmation. Note that, because this is the last step of the wizard, the Finish button is displayed instead of the Next button.
The following is the complete markup for your Web form:
<%@ Page Language="C#" AutoEventWireup="true"
CodeFile="Default.aspx.cs" Inherits="_Default" %>
<html >
<head runat="server">
<title>Untitled Page</title>
</head>
<body>
<form id="form1" runat="server">
<div>
<asp:Wizard ID="Wizard1" runat="server" ActiveStepIndex="2"
BackColor="#EFF3FB" BorderColor="#B5C7DE"
BorderWidth="1px" Font-Names="Verdana" Font-Size="0.8em"
HeaderText="Cool Wizard control"
OnActiveStepChanged="Wizard1_ActiveStepChanged"
OnFinishButtonClick="Wizard1_FinishButtonClick">
<StepStyle Font-Size="0.8em" ForeColor="#333333" />
<SideBarStyle BackColor="#507CD1" Font-Size="0.9em"
VerticalAlign="Top" Width="150px"
Wrap="False" />
<NavigationButtonStyle BackColor="White" BorderColor="#507CD1"
BorderStyle="Solid"
BorderWidth="1px" Font-Names="Verdana"
Font-Size="0.8em" ForeColor="#284E98" />
<WizardSteps>
<asp:WizardStep ID="step1" runat="server"
Title="Account Details">
<table style="width: 100%">
<tr>
<td nowrap="nowrap">
<asp:Label ID="Label1" runat="server" Text="User ID :">
</asp:Label>
</td>
<td>
<asp:TextBox ID="TextBox1" runat="server"></asp:TextBox>
<asp:RequiredFieldValidator ID="RequiredFieldValidator1"
runat="server" ControlToValidate="TextBox1"
Display="Dynamic" ErrorMessage="Please enter User ID">
</asp:RequiredFieldValidator>
</td>
</tr>
<tr>
<td nowrap="nowrap">
<asp:Label ID="Label2" runat="server" Text="Password :">
</asp:Label>
</td>
<td>
<asp:TextBox ID="TextBox2" runat="server" TextMode="Password">
</asp:TextBox>
<br />
<asp:RequiredFieldValidator ID="RequiredFieldValidator2"
runat="server" ControlToValidate="TextBox2"
Display="Dynamic" ErrorMessage="Please enter Password">
</asp:RequiredFieldValidator>
<asp:CompareValidator ID="CompareValidator1"
runat="server" ControlToCompare="TextBox2"
ControlToValidate="TextBox3" Display="Dynamic"
ErrorMessage="Passwords do not match ">
</asp:CompareValidator>
</td>
</tr>
<tr>
<td nowrap="nowrap">
<asp:Label ID="Label3" runat="server" Text="Confirm Password :">
</asp:Label>
</td>
<td>
<asp:TextBox ID="TextBox3" runat="server" TextMode="Password">
</asp:TextBox>
<br />
<asp:RequiredFieldValidator ID="RequiredFieldValidator3"
runat="server" ControlToValidate="TextBox3"
Display="Dynamic" ErrorMessage="Please enter password again">
</asp:RequiredFieldValidator>
</td>
</tr>
<tr>
<td nowrap="nowrap" style="height: 26px">
</td>
<td style="height: 26px">
</td>
</tr>
</table>
<br />
</asp:WizardStep>
<asp:WizardStep ID="step2" runat="server"
Title="Contact Information">
<table style="width: 100%">
<tr>
<td nowrap="nowrap">
<asp:Label ID="Label4" runat="server" Text="Email :">
</asp:Label>
</td>
<td>
<asp:TextBox ID="TextBox4" runat="server"></asp:TextBox>
<asp:RequiredFieldValidator ID="RequiredFieldValidator4"
runat="server" ControlToValidate="TextBox4"
Display="Dynamic" ErrorMessage="Please enter email">
</asp:RequiredFieldValidator>
<asp:RegularExpressionValidator ID="RegularExpressionValidator1"
runat="server" ControlToValidate="TextBox4"
Display="Dynamic" ErrorMessage="Invalid email format"
ValidationExpression=
"\w+([-+.']\w+)*@\w+([-.]\w+)*\.\w+([-.]\w+)*">
</asp:RegularExpressionValidator>
</td>
</tr>
<tr>
<td nowrap="nowrap">
<asp:Label ID="Label6" runat="server" Text="Telephone Number :">
</asp:Label>
</td>
<td>
<asp:TextBox ID="TextBox5" runat="server"></asp:TextBox>
<asp:RequiredFieldValidator ID="RequiredFieldValidator5"
runat="server" ControlToValidate="TextBox5"
Display="Dynamic" ErrorMessage="Please enter email">
</asp:RequiredFieldValidator>
<asp:RegularExpressionValidator ID="RegularExpressionValidator2"
runat="server" ControlToValidate="TextBox5"
Display="Dynamic" ErrorMessage="Invalid tel. no."
ValidationExpression="((\(\d{3}\) ?)|(\d{3}-))?\d{3}-\d{4}">
</asp:RegularExpressionValidator>
</td>
</tr>
<tr>
<td nowrap="nowrap">
</td>
<td>
</td>
</tr>
</table>
</asp:WizardStep>
<asp:WizardStep ID="step3" runat="server" Title="Confirmation">
<table style="width: 100%">
<tr>
<td nowrap="nowrap">
<asp:Label ID="Label5" runat="server" Font-Bold="True"
Text="User ID :"></asp:Label>
</td>
<td>
<asp:Label ID="Label9" runat="server" Font-Bold="True"
Text="Label"></asp:Label>
</td>
</tr>
<tr>
<td nowrap="nowrap">
<asp:Label ID="Label7" runat="server" Font-Bold="True"
Text="Email :"></asp:Label>
</td>
<td>
<asp:Label ID="Label10" runat="server" Font-Bold="True"
Text="Label"></asp:Label>
</td>
</tr>
<tr>
<td nowrap="nowrap">
<asp:Label ID="Label8" runat="server" Font-Bold="True"
Text="Telephone Number :"></asp:Label>
</td>
<td>
<asp:Label ID="Label11" runat="server" Font-Bold="True"
Text="Label"></asp:Label>
</td>
</tr>
</table>
</asp:WizardStep>
</WizardSteps>
<SideBarButtonStyle BackColor="#507CD1" Font-Names="Verdana"
ForeColor="White" />
<HeaderStyle BackColor="#284E98" BorderColor="#EFF3FB"
BorderStyle="Solid" BorderWidth="2px"
Font-Bold="True" Font-Size="0.9em" ForeColor="White"
HorizontalAlign="Center" />
</asp:Wizard>
<br />
<asp:Label ID="Label12" runat="server" EnableViewState="False"
Font-Size="Large"
ForeColor="Red"></asp:Label> </div>
</form>
</body>
</html>