

Introduction
Developers frequently look for opportunities to squeeze the
last drop of performance from their web applications. In ASP.NET web forms and user controls Output
Caching is a very popular performance enhancement technique. The same technique
can also be implemented in ASP.NET MVC
applications. Upon applying the Output Caching techniques, the page output is
cached so that further requests are served with the cached copy rather than processing
and generating it again and again. In this article you will learn how Output
Caching is used in ASP.NET MVC applications along with some
considerations involved in the process.
Output Caching in ASP.NET MVC
If you’ve programmed ASP.NET web forms before, you
are probably aware of the @OutputCache directive. The @OutputCache directive
enables output caching for web forms and user controls. In the case of ASP.NET
MVC applications you won’t be using the @OutputCache directive. You will, instead,
use the [OutputCache] attribute.
The [OutputCache] attribute is actually an ASP.NET MVC
action filter that wraps output caching abilities. Though the entire feature
set of the @OutputCache directive is not available through the [OutputCache]
attribute, implementing output caching in ASP.NET MVC is quite easy. Note that
unlike web forms and user controls where you place the @OutputCache directive
in .aspx or .ascx files, the [OutputCache] attribute is used in controllers.
You can apply the [OutputCache] attribute on individual action methods or to
the controller class itself. In the former case only the output of the action
under consideration is cached, whereas in the latter case output of all the
action methods from that controller is cached.
The OutputCache Attribute
The [OutputCache] directive resides in the System.Web.Mvc
namespace. The following figure shows the inheritance hierarchy of the
[OutputCache] attribute.
![The inheritance hierarchy of the [OutputCache] attribute](https://www.codeguru.com/wp-content/uploads/2021/07/bp_caching_Figure01.jpg)
Figure 1: The inheritance hierarchy of the [OutputCache] attribute
Some of the important properties of the OutputCacheAttribute
class are listed below:
|
Property |
Description |
|
Duration |
Indicates the amount of time in seconds for which the |
|
Location |
Indicates the possible location where the cache is maintained. |
|
NoStore |
This boolean property indicates whether to store output |
|
VaryByParam |
Specifies a list of querystring or form parameters on the |
|
SqlDependency |
Indicates a SQL cache dependency on the basis of which the |
|
CacheProfile |
Specifies name of a cache profile from the web.config |
Creating a Sample ASP.NET MVC Web Application
Now that you know some basics of the [OutputCache]
attribute, let’s use it in a sample ASP.NET MVC application. You will need Visual Studio 2010
with MVC 3 installed in order to work through this example.
Begin by creating a new ASP.NET MVC 3 Web Application and
name the application as CachingInMVC.
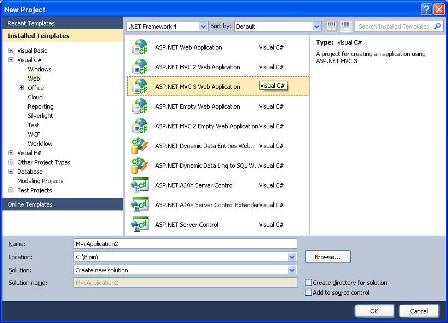
Figure 2: Create a new ASP.NET MVC 3 Web Application
The next screen will allow you to choose the view engine –
Razor or ASPX. Select ASPX in the View engine dropdown and click on OK button.
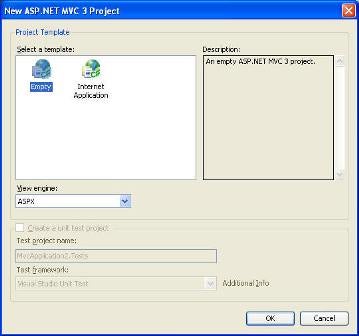
Figure 3: Choose the view engine – Razor or ASPX
Once the Web Application is created add a new SQL Server
database to it and then design a table named Post as shown below:
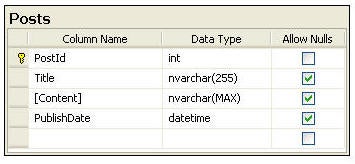
Figure 4: Add a new SQL Server database
The Posts sample table is supposed to store blog posts and
has four columns viz. PostId, Title, Content and PublishDate. The PostId column
is identity column. Once the Posts table is created, proceed by adding a LINQ
to SQL class (.dbml) into the Models folder. Drag and drop the Posts table from
the Server Explorer onto the design surface of .dbml file so as to create Post
class.
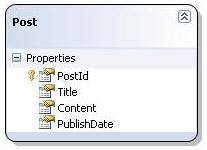
Figure 5: Create the Post class
Now add a new controller class – PostController – in the
Controllers folder. The PostController class will have two action methods,
namely Index() and ShowPost() as shown below:
public class PostController : Controller
{
    public ActionResult Index()
    {
        DataClasses1DataContext db = new DataClasses1DataContext();
        var results = from rows in db.Posts
                        select rows;
        return View(results);
    }

    public ActionResult ShowPost(int id)
    {
        DataClasses1DataContext db = new DataClasses1DataContext();
        var results = from rows in db.Posts
                        where rows.PostId == id
                        select rows;
        return View(results);
    }
}
The Index() action method retrieves all the posts from the Posts
table using a LINQ to SQL query and passes the results to the Index view; (you
will design the Index view later). The ShowPost() action method accepts post ID
as a parameter and renders ShowPost view by passing a single Post object.
Creating the Views
Once the controller is ready, proceed by creating the Index
view. To do so, right click on the Index() action method and select "Add
View" menu option. In the resulting dialog (see below) specify view name
as Index and view engine as ASPX and click Add.
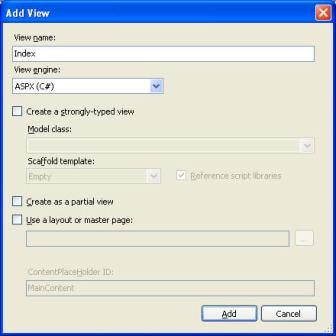
Figure 6: Specify view name as Index and view engine as ASPX
Add the following markup in the Index view (unnecessary
markup has been omitted for the sake of clarity).
<h1>List of Posts</h1>
<table border="1" cellpadding="3">
<%
foreach (var row in Model){
%>
<tr>
<td>
<%= row.PostId %>
</td>
<td>
<%= row.Title %>
</td>
<td>
<%= row.PublishDate %>
</td>
<td>
<a href='<%= "showpost?id=" + row.PostId.ToString()%>'>Show</a>
</td>
</tr>
<%}%>
</table>
The Index view essentially iterates through the Model (i.e. all
records from Posts table) and displays the posts in a table. The table displays
PostId, Title and PublishDate. We also render a hyperlink pointing to the
ShowPost action method and containing PostId in the querystring. This PostId
will be passed to the ShowPost() method.
Next, create the ShowPost view and add the following markup
to it:
<body>
<%
foreach (var row in Model){
%>
<h1><%: row.Title %></h1>
<%: row.Content %>
<hr />
<p><em>Published on :<%: row.PublishDate %></em></p>
<%}%>
</body>
The above markup simply displays post title, content and
publication date.
A sample run of Index and ShowPost views is shown in the
following figures.
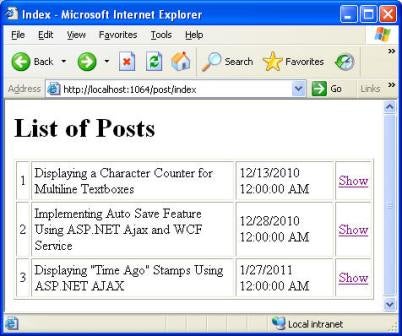
Figure 7: A sample run of Index
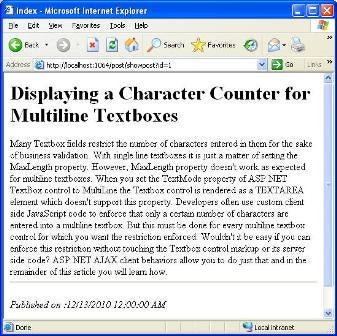
Figure 8: A sample run of ShowPost
Before you apply the [OutputCache] attribute, test the application
by changing Posts table data using Server Explorer and then refreshing the
Index and ShowPost views. Since there is no caching in place, refreshing the
views should immediately display the modified data from the Posts table.
Using OutputCache Attribute
Now let’s use [OutputCache] attribute to enable output
caching for the action methods. Decorate the Index() and ShowPost() action
methods with the [OutputCache] attribute as shown below:
[OutputCache(Duration = 60, VaryByParam = "none")]
public ActionResult Index()
{...}
[OutputCache(Duration = 60, VaryByParam = "id")]
public ActionResult ShowPost(int id)
{...}
In the case of the Index() action method the [OutputCache]
attribute specifies the cache duration as 60 seconds and VaryByParam as none.
For the ShowPost() action method too, the cache duration is 60 seconds but the
VaryByParam property is set to id. This is because you want to cache individual
posts for 60 seconds. If you don’t specify VaryByParam property then for all
PostId values the same cached output will be served and that is not what you
want.
To test the [OutputCache] attribute, run the web application
and navigate to the Index view. Keeping the browser window open, modify the
Posts table data using Server Explorer and refresh the browser window. You will
find that for the specified cache duration (60 seconds in this case) the output
served doesn’t reflect the changes. Try the same with ShowPost view. In this
case a separate copy is cached for each id value and each copy is maintained
for 60 seconds.
Partial Page Output Caching
In the above example you cached the whole view. At times you
may want to cache just a small fragment of the view and not the complete view.
Luckily, you can do so using child actions. Let’s see how.
Open the PostController class and add one more action method
named ShowTimeStamp(). The ShowTimeStamp() action is shown below:
[ChildActionOnly]
[OutputCache(Duration = 60, VaryByParam = "id")]
public ActionResult ShowTimeStamp(int id)
{
    return PartialView();
}
Notice that the ShowTimeStamp action method is decorated
with two attributes – [ChildActionOnly] and [OutputCache]. The former attribute
indicates that the action method under consideration should be called only as a
child action. Once decorated with the [ChildActionOnly] attribute, the action
can be called using either the Action or RenderAction HTML extension methods.
The later attribute essentially caches the output of the action method for 60
seconds.
The ShowTimeStamp() action simply renders a partial view
named ShowTimeStamp. To create this partial view, add a new view but this time
check the "Create as a partial view" checkbox.

Figure 9: Create a partial view
This will add ShowTimeStamp.ascx to the Views > Post
folder. Open the ShowTimeStamp.ascx and simply emit current date and time as
shown below:
<center><strong>
<%= DateTime.Now.ToString() %>
</strong></center>
Now open ShowPost.aspx and at the bottom place the following
line of code:
<% Html.RenderAction("ShowTimeStamp", new {id=postid}); %>
Here, you simply render the output of ShowTimeStamp child
action by passing a post ID.
To test the partial output caching, comment the
[OutputCache] attribute from ShowPost action method and run the application. If
you navigate to a particular post you will find the date time stamp at the bottom.
Refreshing the page won’t change the date time stamp even if ShowPost action is
not caching the output. The time stamp will change only after 60 seconds.
Enabling Output Caching for all actions
In the above example you decorated individual action methods
with the [OutputCache] directive. If all the actions from a controller class
require output caching to be enabled and all of them share the same caching
properties (duration for example) then you can apply the [OutputCache]
attribute to the controller class itself.
[OutputCache(Duration = 60, VaryByParam = "none")]
public class PostController : Controller
{
    ...
}
Storing Caching Configuration in web.config
In the above example you specified caching related
properties (Duration, VaryByParam etc.) in the controller itself. If you wish
to change any of these parameters you will need to recompile the controller
again. You can avoid this by moving the cache configuration in a web.config
file and then using the CacheProfile property of the [OutputCache] attribute to
point to it.
<caching>
    <outputCacheSettings>
        <outputCacheProfiles>
            <add name="MyCacheProfile" duration="60" varyByParam="none" />
        </outputCacheProfiles>
    </outputCacheSettings>
</caching>B B B B B
The <outputCacheProfiles> section shown above defines
a cache profile named MyCacheProfile. To refer it in a controller you will use
the following code:
[OutputCache(CacheProfile="MyCacheProfile")]
public ActionResult Index()
{...}
Using SQL Cache Dependency
Just like normal web forms, ASP.NET MVC applications can
also make use of SQL cache dependency. To do so you need to configure the SQL
Server database using aspnet_regsql.exe tool (we won’t discuss it here since
the process is exactly same as in web forms). Once configured you need to add a
<sqlCacheDependency> section in the web.config as shown below:
<caching>
    <sqlCacheDependency enabled="true">
        <databases>
            <add name="MySqlDependency"
            connectionStringName="Database1ConnectionString"
            pollTime="500"/>
        </databases>
    </sqlCacheDependency>
</caching>
Finally, the [OutputCache] attribute can make use of the
MySqlDependency as shown below:
[OutputCache(Duration=60,SqlDependency = "MySqlDependency:Posts")]
public ActionResult Index()
{...}
Notice how the SQL cache dependency is specified as
dependency_name:table_name. Once specified, the cache will be invalidated
whenever data from the Posts table changes. The pollTime attribute can be
adjusted to change the frequency of checking the SQL server database for any
changes.
Summary
Output caching is a technique wherein the output of a
controller action is cached for a specified duration. During the specified
duration all the requests served by the controller action get the cached copy.
Since there is no processing on the server, good performance benefits can be
obtained. To enable output caching you use [OutputCache] attribute on action
methods or the controller class. You can also cache just a fragment of the
total output by caching the output of child actions. If needed, the cache
configuration can be stored in a web.config file and then can be referred to
from any controller. SQL cache dependency can also be set so that the cache is
invalidated when database data changes.