

Introduction
One of our clients addressed KBSoft with an idea to create a commercial toolbar for Internet Explorer. The idea was simple—it was necessary to implement a toolbar for Internet Explorer 7.0 containing the following elements:
- Company logo
- A search field, allowing the user to send a search request to an arbitrary site and display the results in the browser
- Expand buttons, containing ab arbitrary number of links
- Drop-down lists displaying RSS-channels
We started to work on this task with a choice of a platform. As it turned out, it is not a simple thing to make a toolbar for Internet Explorer with a declared functionality. It is necessary to deal with COM components, interact with browser and store cached data somewhere. Fortunately, it appeared that it is possible to do everything on .Net 2.0. platform, which simplified the task a lot. The result of our work is given below—it is the IEToolbarEngine component, presenting a high level interface for a toolbar and its elements creation. Perhaps this component will allow you to implement your own toolbars or you will find some useful data for the implementation of your own projects in the MS Visual Studio environment in the description of this device.
Usage
IEToolbarEngine is inherited from the BandObject component, written by Pavel Zolnikov and described in the article “Extending Explorer with Band Objects using .NET and Windows Forms”. We, at KBSoft, modified it so it would be possible to build our toolbar in Internet Explorer. After that, we wrote a small library of classes enabling to add different elements into the toolbar.
Generally speaking, the toolbar presents its UserControl with a System.Windows.Forms.ToolStrip component placed on it. When this control is loaded, the CreateToolbarItems function is activated. This event should be paid great attention because the main initialization of toolbar elements happens in it. You can bring changes into it for creation of your own toolbar. Its fragment is given below.
internal void CreateToolbarItems ()
{
   try
   {
      ...
      //Get current assembly.
      Assembly currentAssembly =
         Assembly.GetAssembly( this.GetType() );

      //Links cration.
      Link link1 = new Link("Home page",
         "http://kbsoft-group.com/");

      Link link2 = new Link("Clear Search History",
         IEToolbarEngine.WrapInternalCommand(IEToolbarEngine.
         cmdClearHistory));

      //Getting image from resources
      Image img =
         Image.FromStream( currentAssembly.
         GetManifestResourceStream("IEToolbarEngine.main.png") );

      //Create toobar item.
      menu = new MainMenu( this, "Company", "Main",
         new Link[] { link1, link2 }, img);

      //Add item to internal collection
      items.Add (menu);
      ...
   }
}
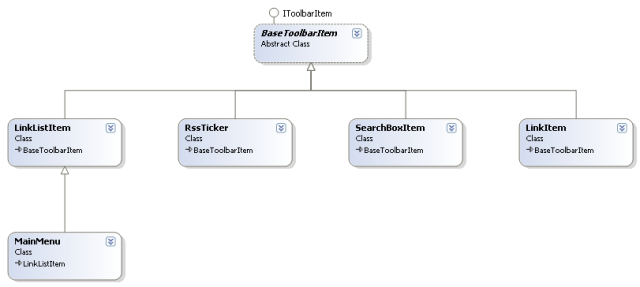
The creation of one toolbar element is demonstrated here; this element contains a logo and a brief drop-down menu. An item is created with the help of the MainMenu class. Two links and an image are added to it. A Classes diagram displaying a simple architecture of toolbar elements is given below:
A created element will look like this:

The title text, tips, array of links (KeyValuePair
Note: For those who are curious, that name of a resource embedded into the assembly is formed from the default namespace name, and from the resource name itself (hence, the line IEToolbarEngine.main.png).
After a creation, it is necessary to add a new element into the collection of IEToolbarEngine Items class.
Creation of several elements is demonstrated in IEToolbarEngine project attached to this article. Here, you can view them in sequence.
SearchBoxItem
new SearchBoxItem (this, "<clear>", "terms to serach!",
   "http://www.google.ru/search?q={0}",
   "Search here", "Search", "Click to search",new Size (160, 16),
   FlatStyle.System, img);
The SearchBoxItem class presents a search line with a button starting the search. The line can navigate to an arbitrary site supporting a search with parameters specified in GET request.
The following parameters are specified to the constructor: link to IEToolbarEngine class, line that will be displayed in a combobox for an item of search history clearing, prompt line, search line, pop-up prompt line, text on search button, search field size, its style, and a link to the image for search button. This element will look like this:
![]()
A few words about search line format: There is a q={0} parameter in it. Here, q is the parameter name, used in your search query, and {0} will be substituted automatically to the line that a user enters into search line. If there is another parameter name in your search query, it should be staned instead of q.
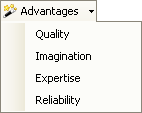
LinkListItem
LinkListItem(this, "Advantages", "Advantages",
   new Link[] { link1, link2, link3, link4 }, img);
This is a simple list with links. The constructor parameters link to IEToolbarEngine class, button text, tooltip text, and collection of elements. The exterior is shown below:
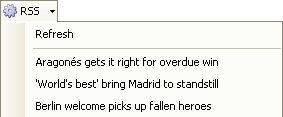
RssTicker
RssTicker(this, "RSS", "RSS Channel",
   "http://www.euro2008.uefa.com/rss/index.xml", 1440,
      img, "RSSChannel");
This element presents a list of links received from an RSS feed. For that, a link to the RSS feed and a period of channel update is given to a constructor. The string, a unique name of a RSS channel, which will be used for the creation of a cache file in the application folder in “Application Data\IEToolbar\Cache”, should be transmitted last.
The resulting element looks like the following:
Installation Project
Also, the demo project contains an installation project called IEToolbarInstallation, generating a Setup.exe file, which allows you to install the toolbar to the user machine and delete it if necessary. It is created in MS Visual Studio. The moments, connected with the implementation of the installation project that should be paid attention to, are given below.
There is an IEToolbarInstaller class, derived from System.Configuration.Install.Installer in the toobar assembly (IEToolbar.dll is created by the IEToolbarEngine project). To show the installer that this class method should be started in the process of installation, it is marked by the RunInstallerAttribute attribute. The Install and Uninstall methods are overriden in it. Install implements a registration of a build as COM server. Uninstall, correspondingly, cancels its registration.
The RegisterAssembly function of the RegistrationServices class is used for registration. It is necessary to note that this assembly is not installed in GAC; that is why registration should be implemented with the AssemblyRegistrationFlags.SetCodeBase key. For that, it is necessary for the assembly to be strongly named; otherwise, registration can go the wrong way.
The installer is given a directive to search this class in the build at the installation and start its Install and Uninstall actions. For that, a new action is added into “Custom Actions” section in the project, for which a IEToolbr.dll file of the build is selected in the “custom action surce” field.
Basic for the IEToolbarEngine class BandObject contains Register and Unregister functions. Register is started in the process of registration and executes the adding of keys, necessary to embed the toolbar into Internet Explorer, into the Windows Registry. Unregister is started at the installation and deletes the information connected with the toolbar, from the Windows Registry.