

Localizing Windows Forms Application
To make software available for international users, it must accommodate the changes in different languages and cultures. Many times, the first version of the software is developed in English and, when business moves from a single country to international market, changes are made to the existing software; this results in bad design and a lot of maintenance costs. So, the needs of world-ready software must be considered at the beginning of the project.
In the early days, you wrote a lot of code for mundane tasks of localization. Now, with the .NET Framework and Visual Studio IDE, these tasks have become very easy. Now you can add localization features to your applications without putting in much effort. There are many differences in how you localize the ASP.NET and Windows Forms application. In this article, I will walk through the localization of the Windows Forms application.
Step 1
Open Visual Studio 2008 and create a new project. Choose the Windows Forms Application template and name the application WinTest.
Step 2
Rename the default Form1 to LocalizedForm and add following controls to it:
| Control | Name | Text |
|---|---|---|
| Label | AmountLabel | Amount |
| TextBox | AmountTextBox | |
| GroupBox | TypeGroupBox | Type of Payment |
| RadioButton | PaymentRadioButton | Payment |
| RadioButton | ExpenseRadioButton | Expense |
| Button | OKButton | OK |
| Button | CancelButton | Cancel |
Step 3
Change the following properties of the LocalizedForm.
| Property | Value |
|---|---|
| Text | Localized Form |
| AcceptButton | OKButton |
| CancelButton | CancelButton |
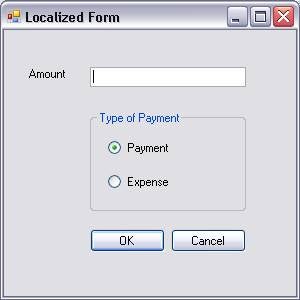
The LocalizedForm should look like the following figure.
Step 4
Open the properties window of the LocalizedFrom and change the value of Localizable property to True. Once the Localizable property is changed to True, Visual Studio automatically adds a resource file, LocalizedForm.resx, to the project.
Step 5
Now, go the language property and choose French (France) from the drop-down list against it. Change the Text properties of the controls as shown below.
| Control Name | Text |
|---|---|
| LocalizedForm | Forme localisée |
| AmountLabel | Montant |
| TypeGroupBox | Type de paiement |
| PaymentRadioButton | Paiement |
| ExpenseRadioButton | Dépense |
| OKButton | OK |
| CancelButton | Annuler |
As you change the properties of the controls, one more resource file, LocalizedForm.fr-FR.resx, is added to the project. LocalizedForm.resx stores the settings for English language whereas LocalizedForm.fr-FR.resx stores settings for the French language. If you open these two files in the IDE and look for the Text properties that you just changed, you will see the following values.
LocalizedForm.resx
| Name | Value |
|---|---|
| $this.Text | Localized Form |
| AmountLabel.Text | Amount |
| CancelButton.Text | Cancel |
| ExpenseRadioButton.Text | Expense |
| OKButton.Text | OK |
| PaymentRadioButton.Text | Payment |
| TypeGroupBox.Text | Type of Payment |
LocalizedForm.fr-FR.resx
| Name | Value |
|---|---|
| $this.Text | Forme localisée |
| AmountLabel.Text | Montant |
| CancelButton.Text | Annuler |
| ExpenseRadioButton.Text | Dépense |
| PaymentRadioButton.Text | Paiement |
| TypeGroupBox.Text | Type de paiement |
As you saw above, resource files save the values corresponding to different languages, but if you have noticed above in the LocalizedForm.fr-FR.resx file, the Text of the OKButton is not saved. This is because the text of the OKButton in the French is the same as in the default culture, in the LocalizedForm.resx file. This is true with all the resource files; the resource files other than the default one only saves those values that are different from the default ones. All other values are taken from the default resource file.
Step 6
Now press F5 to run the application. You will see the LocalizedForm with all the captions in English. The application automatically picks up the current culture information from the windows. Because your default culture is not French, all the captions are displayed in English.
An application can take the current culture settings from Windows, but many times you also may need to have the settings configurable in the application itself. For example, a user knows more than one language; the language of Windows is set as English, but the application should run in French because the application is used by another user who knows only French. For this test application, you will change the current culture in the code so that we can see the settings of the French culture.
Step 7
Open the Program.cs file and change the current culture to fr-FR. Your code should look like what’s shown below.
static void Main()
{
   //localization code
   Thread.CurrentThread.CurrentUICulture = new CultureInfo("fr-FR");
   Thread.CurrentThread.CurrentCulture   = new CultureInfo("fr-FR");

   Application.EnableVisualStyles();
   Application.SetCompatibleTextRenderingDefault(false);
   Application.Run(new LocalizedForm());
}
As seen in the preceding code, in .NET you have two classes, CurrentUICulture and CurrentCulture, for culture settings. CurrentCulture provides the culture-specific information, such as language and formats of numbers, date, casing conventions, and so forth, whereas CurrentUICulture maps to the Language settings in Windows. They are usually the same, but they can be set to different values.
You chose the fr-FR culture here because you already have created resources files for this culture. In fr-FR, fr represents the neutral culture of French whereas FR represents the specific culture of France. For one neutral culture, there can be many specific cultures; for example, in fr-CA, CA represents the specific culture of Canada.